Popular Posts

Showing posts with label DIY. Show all posts

Thursday, March 19, 2015

Mini tote bag instructions

Cut two pieces of material 
8"wide by 9" high 
Cut two handles
To desired lenght 
Stitch around three sides, make sure you backstitch at the beginning and end.
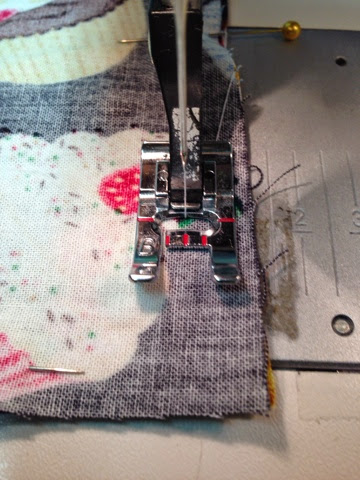
Fold the corners into a triangle to form the bottom. For this size I did two inches from the center of the needle to the tape. ( I like to use the tape when teaching these so both sides are the same.)
Fold the top over double 1/2" and pin handles in place. 
Stitch across top, make sure you secure handles by going back and forth a couple of times on each.
You are done! Congratulations.
Maria

Wednesday, November 19, 2014

Infinity Scarves

Infinity Scarves 

Some of the infinity scarves made by some of my students during sewing classes.


Enjoy,
Maria

Friday, May 30, 2014

Cute Pillowcase Dress How-To by guest writers: Angelina and Isabella


This blog is being taken over temporarily by worker bees Izzy and Angelina as they guide you through a simple tutorial for a pillowcase dress. This cute and easy project is suitable for kids or teens as a beach cover-up, a fun party dress, or a casual sun dress. Work alongside with us as we put together this adorable outfit.


Step 1: Fold your fabric over to have two panels and decide how long you want your dress to be. We decided to mark it at about 34 inches. Then, we cut the fabric along our marking.


Step 2: Cut down the center between your two folds to create two panels of fabric.


Step 3: Mark where your arm holes will be on both panels. Then cut them out. (At this point you should line up your panels to make sure they are the same length and that there are no irregularities.)


Step 4: Take both pieces of fabric and place them right sides together. Then pin them together along the sides, leaving arm holes open.


Step 5: Get over to your sewing machine and sew both sides of the dress, leaving the top and bottom open.


Step 6: Create a casing for the elastic that will be at the top of your dress. Fold the fabric at the top over and iron it to create a crease, then fold it over again so there are no raw edges. Sew the casing so there is an opening through which you will thread your elastic.


Step 7: Measure and cut your elastic. Cut out two pieces at about a length of 7 inches each.


Step 8: Thread the elastic through the casing, then sew the edges closed on both sides. (Remember to backstitch the edges!)


Step 9: Place Bias tape along the sides where the arm holes will be. (We used Bias tape but ribbon will work just as well.) Pin the tape, then sew it on. When sewed, the Bias tape will be ribbon-like and tie above the shoulders to create straps.


Step 10: Hem the bottom of your dress, and you're done!


Thanks for sewing with us, we hope you've enjoyed this tutorial for an adorable pillowcase dress.

Until next time!
Peace Out,
Isabella and Angelina


Tuesday, April 15, 2014

Zipper pouch


Zippered pouch 


Supplies needed
4 pieces of fabric the same size
Zipper the same size as top of your bag or pouch
Standard sewing machine foot and zipper foot
Thread 
Pins


1. Place zipper face down on right side of fabric (facing outside fabric).

2. Place lining fabric on top of back side of zipper and pin all three layers. Make sure all three edges are even.


3. Unzip zipper a little before you start sewing so you don't have a bump near the zipper pull. Stitch zipper using your zipper foot. Make sure you remember to back stitch at the beginning and end of the zipper. (Hint when doing zippers always open it a little sew until you are near the zipper pull, but not on top of it and close the zipper that way you don't get that bump around the pull and continue sewing).


4. Open up fabric


5. Place outside fabric over zipper and lining under zipper as shown and stitch. Remember to leave zipper open a little when you are sewing.


6. Open all four layers and pin all around make sure the outside fabric edges all meet and the lining edges all meet. Leave a hole at the bottom in the lining so you can turn it inside out. 

7. Stitch all around remember to leave a hole and backstitch at beginning and end. When you get to your corners put your needle down lift your presser foot and turn your fabric so you have a sharp corner, lower your presser foot and continue sewing. Make sure you do that for all four corners.  Careful when you sew near the edge of your zipper. 

8. Turn it inside out and close the hole in the lining either by machine or by hand.

9. Push corners out and lining in and you are done!

Congratulations, I'm so proud!

Saturday, July 14, 2012

Cover Stitch with pictures

Cover stitch done with double needle on a knit dress.

I had to do alterations on some knit dresses and went to price out a cover stitch machine and had sticker shock.  I thought well I will just go back to doing things the way I normally do them.

This is how I do a cover stitch

  1. Shorten  hem as always .

  1. Serge bottom of hem.

  1. Turn hem under and press with pressing cloth so as not to burn the item.

  1. Turn the item over, press again and pin hem on the right side of the fabric.

  1. Insert double needle into your machine. Thread with two spools of thread. Make sure you run both threads through the same tension disk.

  1. Put your machine into a double needle position if it has one.

  1. Make sure your serged edge is completely under the  presser foot or it will not catch on both sides of the material.

  1.  Use the markings on your sewing  machine as a guide to keep you sewing straight.
Use measuring lines to keep your stitching straight or you can use masking tape to make lines in between


Under side of dress. Serged edge and bobbin stitching.

 9. Your stitching is complete just make sure you watch the end very careful, because now you have two stitching lines to match up not just one.

Hope this helps if you have any questions just email me.