Friday, November 29, 2013
Black Friday special
I'm having $20.00 off three different sewing classes today and tomorrow only. Check out the link below.
Friday, November 1, 2013

Tuesday, October 8, 2013


Monday, October 7, 2013
Basic Sewing Supplies
1. Fabric snips on a clip, so I can clip them to my shirt.


2. Fabric scissors.
3. Pins
4. Magnetic bowl or pin cushion
5. Tracing wheels
7. Marking chalk or pencil
8. Tracing or wax paper
9. Measuring gauge
10. Tape measure
11. Seam ripper
12. Thread
13. Thread conditioner (wax) (Thread Heaven)
14. Hand sewing needles
15. Yard stick
16. Thimble
There are a lot of different tools that I have incorporated from sewing all different kinds of projects into my regular sewing and these are a few. They are not necessary but, if you plan on doing a lot of different types of sewing I would definitely recommend that also get in the items below.
I also like to have a self healing cutting mat, ruler and rotary cutter on hand (rotary cutters are not meant to be used on anything but cutting mats, they definitely will ruin your table or anything else you try to used them on). They are very sharp and you need to be careful, make sure you close it when not in use.
If I'm doing window treatments I also like to have a 72 inch metal ruler.
I believe that is about it for basic tools. Remember sewing is supposed to be a relaxing experience the only mistake you can make is cutting ( remember measure twice cut once) and not a big deal we just go out to Fabric store and get new fabric. If you make a mistake sewing, you just use your seam ripper that's what it's for.
Happy sewing,
Maria
Thursday, October 3, 2013
Pleather, clear vinyl aprons
How much fun are these? Great for cleaning up, painting, crafting so many things. 


Wednesday, October 2, 2013
Sewing 101 in Portuguese
Sewing 101
I just love teaching and today was no exception. Except for the fact that I did the class half in English and half in Portuguese. Teaching sewing in Portuguese is new for me. I have been teaching a class in social media and selling on the internet in Portuguese, but sewing is a little different.
It was so much fun watching someone who didn't know how to thread a machine leave the sewing studio with a zippered wristlet. Today I taught a mother and daughter how to sew and this is what they made.

I just love teaching and today was no exception. Except for the fact that I did the class half in English and half in Portuguese. Teaching sewing in Portuguese is new for me. I have been teaching a class in social media and selling on the internet in Portuguese, but sewing is a little different.
It was so much fun watching someone who didn't know how to thread a machine leave the sewing studio with a zippered wristlet. Today I taught a mother and daughter how to sew and this is what they made.
Monday, July 15, 2013
Pillows 101 September Class
I decided to have a pillow class in September for the beginner sewer. First we will practice sewing straight and pivoting our fabric so we can have great corners. Then we will be cutting out the pillow and installing a zipper on the bottom. Once that is done we will sew all around and our pillow will be done. Pre registration is required, no walk-ins please.

http://www.mariasewsalot.com/Pages/Classes.aspx
Friday, July 12, 2013
September is National Sewing Month
September is National Sewing Month. I'm going to start the very beginning of the month with sewing classes. I'm sew excited! Classes are going to start on the third so we can start of and get four full weeks. I have been pinning all kinds of boards on Pinterest of the fun things I want to do. The Sewing 101 are starting to fill up the specialty class I will be adding in a couple of weeks. I'm thinking we are going be sewing here 7 days a weeks and I just can't wait! National Sewing Month +Maria Sews A Lot is going to be a blast! Wait until you see the little crochet flowers I'm working on.http://www.mariasewsalot.com/Pages/Classes.aspx
Saturday, July 6, 2013
September Sewing Classes
In September we will be starting all our sewing classes the first week so we can get a whole four weeks of sewing fun in. We will be keeping the Sewing 101 the same Monday's 10-12 Wednesday's 6:30-8:30 and Saturday's 9-11. That seemed to work out for most people. If it didn't work out for you send me and e-mail. The Know Your Sewing Machine I will continue doing as a private class, as I feel people get more out of it that way and they learn about their machine not somebody else's.

I will be adding a few more classes and put up a calendar so people can see what classes are what days. I will be adding a window treatment class, a pillow class, a flower making class, crochet class, knitting class. A start your own sewing business class and the class everyone has been asking me for is a social media class. Let's get everybody's Klout up. http://klout.com/home
If there are specific class someone is interested in taking please let me know.
It's going to be an exciting time at 262 Main St. this September. Hope everyone is ready? I will be adding classes the month of August the the link below will be changing.
Embroidered beach totes
Lately I have come to really love my embroidery machine. I have been playing with the different fonts available and making beach totes for people. Here are some samples. Hope you like them.


Thursday, July 4, 2013
July 4th Independence Day
Happy Independence Day, hope you fly your flags proud and are thankful for all you have. It's been a long week here and an even longer weekend. It's now time to merge all our different cultures into one great culture and head to the beach or have a barbecue, parade or baseball or how ever you choose to celebrate July 4th. After all how many countries really have a birthday?

My God! How little do my countrymen know what precious blessings they are in possession of, and which no other people on earth enjoy! ~Thomas Jefferson
Friday, June 14, 2013
Beach totes and backpacks


Saturday, June 8, 2013
Sewing Inspiration for starting your business
Lately I have been having a lot of women calling or emailing me about starting their own sewing related business. So I have decided that come September I will be having a class to help everyone get all their thoughts and ideas down. To help everyone form a timeline of when they want to start and what it is exactly they want to do. There are so many talented people out there, there is no reason why you should let a little fear get in your way.
If you are one of the few that has driven by the studio and thought maybe I should stop, well you really should. It's a lot of fun, maybe this blog is for you to see. I am also looking for a few talented sewing and crafting teachers for fall classes, if that is you call, email, text, Facebook or better yet stop by. You might like it.

If you are one of the few that has driven by the studio and thought maybe I should stop, well you really should. It's a lot of fun, maybe this blog is for you to see. I am also looking for a few talented sewing and crafting teachers for fall classes, if that is you call, email, text, Facebook or better yet stop by. You might like it.
Monday, June 3, 2013
Custom Sewing
Custom Sewing
Lately I have been getting a lot of calls from people that want custom items sewn. I am really enjoying that. It started with an apron then a knitting needle case, an embroidered hanky made out of someone's shirt. Then back to an apron again, a pocketbook, a wine glass coaster, backpack and back to an apron. The first apron was very design specific, the second one we worked on was a custom embroidery that I thought came out pretty good. It made me realize how much I really love making custom sewing items. It made realize how lucky I am that I get to do what I love every day and people get so happy to receive the sewing items I make for them. Hope you enjoy these pictures, check out my Facebook for more.


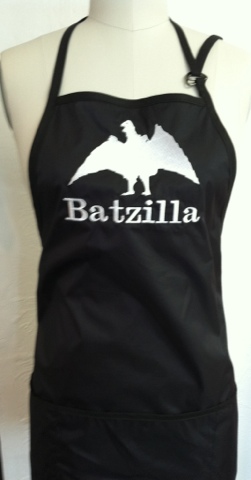

Lately I have been getting a lot of calls from people that want custom items sewn. I am really enjoying that. It started with an apron then a knitting needle case, an embroidered hanky made out of someone's shirt. Then back to an apron again, a pocketbook, a wine glass coaster, backpack and back to an apron. The first apron was very design specific, the second one we worked on was a custom embroidery that I thought came out pretty good. It made me realize how much I really love making custom sewing items. It made realize how lucky I am that I get to do what I love every day and people get so happy to receive the sewing items I make for them. Hope you enjoy these pictures, check out my Facebook for more.

Monday, May 20, 2013

Sunday, May 19, 2013


Friday, January 18, 2013
Wristlet how to
Here is the wristlet information everyone really needs. I'm going to write it up like a recipe with pictures. I'm not putting any sizes because you can make it any size or shape you want. If you want to add any ribbon or anything else to your fabric sew it on your designer fabric first while it is still a single piece. If you have any questions message me.
Supplies
2 pieces of designer fabric (cut to your requirements)
2 pieces of lining fabric ( cut to your requirements)
Zipper (length of opening)
1. Place Designer or outside fabric on table facing up. Place zipper facing down on designer fabric. Place lining over zipper and designer fabric. Pin. Stitch
2. Put designer fabric right side up put completed piece over designer fabric and line up zipper. Place line over zipper, pin stitch.
3. Open up all 4 pieces and top stitch each top and bottom. Make sure you move the zipper foot to the other side if you need to.
4. Now here is the tricky part. Take both lining pieces together and both designer or outside pieces together. And pin them.
5. Match center seams and pin leave zipper open half way for easier turning and sewing. Pin all around except for about 2" on bottom of lining ( very important for turning later). If you are placing a wrist strap you would do that now. That would go about 1 1/2" from your zipper opening for safety. Now you can sew.
6. Turn inside out pull out corners and you have a wristlet or make-up bag. You just need to sew up the bottom of the lining. That is just a straight stitch and you're done.


Supplies
2 pieces of designer fabric (cut to your requirements)
2 pieces of lining fabric ( cut to your requirements)
Zipper (length of opening)
1. Place Designer or outside fabric on table facing up. Place zipper facing down on designer fabric. Place lining over zipper and designer fabric. Pin. Stitch
2. Put designer fabric right side up put completed piece over designer fabric and line up zipper. Place line over zipper, pin stitch.
3. Open up all 4 pieces and top stitch each top and bottom. Make sure you move the zipper foot to the other side if you need to.
4. Now here is the tricky part. Take both lining pieces together and both designer or outside pieces together. And pin them.
5. Match center seams and pin leave zipper open half way for easier turning and sewing. Pin all around except for about 2" on bottom of lining ( very important for turning later). If you are placing a wrist strap you would do that now. That would go about 1 1/2" from your zipper opening for safety. Now you can sew.
6. Turn inside out pull out corners and you have a wristlet or make-up bag. You just need to sew up the bottom of the lining. That is just a straight stitch and you're done.
Wednesday, January 16, 2013
Shiny Princess Room at Maria Sews A Lot
The Shiny Princess Room is a place where I think people are going to have a lot of fun. I can see birthday parties there, craft parties, parents having fun with their kids. This is the room where we are going to have mommy and me classes or Grammy and me or maybe just a special person and me. I see it as a place where there are no phones, no electronic games just some good old time fun. Sometimes we need a break from everything and need a happy place. I want the Shiny Princess room to be that place.
Whether you come to a party or to relax and paint a plate or a glass. It's up to you, maybe you just want to come and make matching bracelets for you and someone special or come alone and get a break from the kids.
Parties are only on the weekends during the we sew and it's pretty quiet.
Hope to see you soon,
Maria
Whether you come to a party or to relax and paint a plate or a glass. It's up to you, maybe you just want to come and make matching bracelets for you and someone special or come alone and get a break from the kids.
Parties are only on the weekends during the we sew and it's pretty quiet.
Hope to see you soon,
Maria
Wednesday, December 26, 2012
50% off aprons @mariasewsalot

I decided to have a 50% off my aprons from today until December 31st, 2012 at the studio and on my Etsy shop. Take a look at the link above.Nikon Coolpix L810 16MP 26X Optical Zoom Black Digital Camera (Google Affiliate Ad)Canon EOS Rebel T3 Digital SLR Camera With 18-55mm IS II Lens - REBEL T3 (Google Affiliate Ad)Nikon Coolpix L810 16MP 26X Optical Zoom Black Digital Camera (Google Affiliate Ad)
Wednesday, December 19, 2012
Today I shipped an apron to Russia
It always amazes me when I ship something across the country how easy it is. I never thought it would be so easy to ship to Russia. All you do is fill out the customs form with your information, your customer's information, what you are shipping and the value and you can ship it. So easy, I don't know why more people aren't doing it. Don't get me wrong I still love shipping in the USA and I still get excited when I ship to a new state. It's just makes me feel great when someone in a country I have never been to likes something I created. I love being able to do what I love everyday.

Subscribe to:
Posts (Atom)