Sewing Camps Available for the Summer
Fun sewing classes so you can learn to use a sewing machine, read a pattern and let out your creativity. The student will pick a project each day while learning how to put in a zipper, insert an elastic and a few other challenging sewing skills. Class sizes are small so each student will be able to get individual attention while practicing his or her new skill. No more than 5 students per class. 4 Required per session for class to run.
***Supplies included for the first two days of classes.
Camp dates
July 7th-11th
July 14th-18th
Morning classes from 10:00-12:00 will be in Framingham at Sewfisticated on Howard St $125.00 for week
July 21st-25th
July 28th- August 1st
Class hours:
9:00am-12:00pm Monday-Friday
or
1:00pm-4:00pm Monday-Friday
Cost: $185.00

Minimum number of students required for each session to run
Contact me with any questions
Where Friends and Creativity Meet
|
Sewing Camp Schedule
Day One:
Learn to use your sewing machine. Start with a simple project like a pillow or a tote bag.
Day Two:
Refresh your skills with the machine and make a pillow or tote bag.
Day Three:
Continue your progress with your machine and make a purse or a zippered wristlet.
Day Four:
Master your new skills by making a stuffed animal of your choice.
Day Five:
Perfect your skills by making a pair of pajama pants.
***Based on skill level and interests projects can be changed and chosen by the student.
|      |
Tuesday, June 17, 2014

Friday, May 30, 2014
Cute Pillowcase Dress How-To by guest writers: Angelina and Isabella


This blog is being taken over temporarily by worker bees Izzy and Angelina as they guide you through a simple tutorial for a pillowcase dress. This cute and easy project is suitable for kids or teens as a beach cover-up, a fun party dress, or a casual sun dress. Work alongside with us as we put together this adorable outfit.
Step 1: Fold your fabric over to have two panels and decide how long you want your dress to be. We decided to mark it at about 34 inches. Then, we cut the fabric along our marking.


Step 2: Cut down the center between your two folds to create two panels of fabric.

Step 3: Mark where your arm holes will be on both panels. Then cut them out. (At this point you should line up your panels to make sure they are the same length and that there are no irregularities.)


Step 4: Take both pieces of fabric and place them right sides together. Then pin them together along the sides, leaving arm holes open.


Step 5: Get over to your sewing machine and sew both sides of the dress, leaving the top and bottom open.

Step 6: Create a casing for the elastic that will be at the top of your dress. Fold the fabric at the top over and iron it to create a crease, then fold it over again so there are no raw edges. Sew the casing so there is an opening through which you will thread your elastic.


Step 7: Measure and cut your elastic. Cut out two pieces at about a length of 7 inches each.

Step 8: Thread the elastic through the casing, then sew the edges closed on both sides. (Remember to backstitch the edges!)


Step 9: Place Bias tape along the sides where the arm holes will be. (We used Bias tape but ribbon will work just as well.) Pin the tape, then sew it on. When sewed, the Bias tape will be ribbon-like and tie above the shoulders to create straps.


Step 10: Hem the bottom of your dress, and you're done!

Until next time!
Peace Out,
Isabella and Angelina
Sunday, April 27, 2014
Sewing Birthday party
I'm so excited, I had my first sewing Birthday party. It was very busy. I had eight new sewers on my hand. I hand to teach them to use the machines, make sure the used them safe, followed directions and sewed straight. They did great! I think I enjoyed the experience as much as they did. There is nothing like the feeling of hearing someone new saying this is so much fun. That's all I wanted out if my day, to make sewing fun. Here are some of the handbags they made. Pretty good job if I do say so myself. I wouldn't be surprised if more then half of them don't become life long sewers.

The pattern for these handbags will be available shortly on my website. The handbags are reversible and great for beginners. This pattern was designed by a 20 year old new sewer. I do have to say I am impressed with that myself.
www.mariasewsalot.com
Wednesday, April 16, 2014


Tuesday, April 15, 2014
Zipper pouch
Zippered pouch

Supplies needed
4 pieces of fabric the same size
Zipper the same size as top of your bag or pouch
Standard sewing machine foot and zipper foot
Thread
Pins
1. Place zipper face down on right side of fabric (facing outside fabric).

2. Place lining fabric on top of back side of zipper and pin all three layers. Make sure all three edges are even.

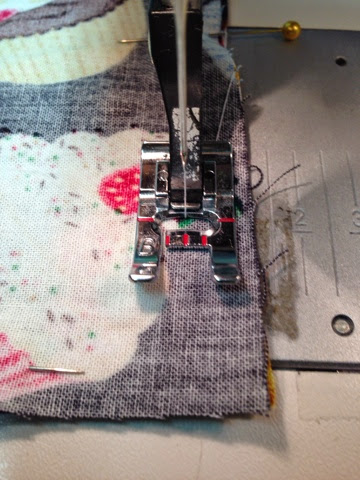
3. Unzip zipper a little before you start sewing so you don't have a bump near the zipper pull. Stitch zipper using your zipper foot. Make sure you remember to back stitch at the beginning and end of the zipper. (Hint when doing zippers always open it a little sew until you are near the zipper pull, but not on top of it and close the zipper that way you don't get that bump around the pull and continue sewing).

4. Open up fabric

5. Place outside fabric over zipper and lining under zipper as shown and stitch. Remember to leave zipper open a little when you are sewing.

6. Open all four layers and pin all around make sure the outside fabric edges all meet and the lining edges all meet. Leave a hole at the bottom in the lining so you can turn it inside out.

7. Stitch all around remember to leave a hole and backstitch at beginning and end. When you get to your corners put your needle down lift your presser foot and turn your fabric so you have a sharp corner, lower your presser foot and continue sewing. Make sure you do that for all four corners. Careful when you sew near the edge of your zipper.


Sunday, April 13, 2014


Friday, April 4, 2014
Sewing Birthday Parties at Maria Sews A Lot

I'm going to let the birthday person pick what he or she wants to make and show them how to use the sewing machines and let them create what they will. They will get to choose between pocketbooks, backpacks, stuffed animals, pillows, tote bags or whatever they decide. I can't wait!
Here is the link to my site Maria Sews A Lot Sewing Birthday Parties


Thursday, February 27, 2014
March 2014 Sewing Classes

Very excited about the new classes! Can't believe how many kids I'm teaching, and they keep getting younger each time. Do what you love, and love what you do.
Maria
www.mariasewsalot.com
Thursday, February 13, 2014


Wednesday, February 12, 2014
February Kid's Sewing Classes
Join us for February Kid's Sewing Classes and learn the basics of sewing. These classes are for everyone and anyone who wants to learn sewing basics by making simple projects you can complete in one class. Join us for one, or take them all!
February 17-19
10:00am-12:00pm or
1:00pm-3:00pm
Monday 17Th Make your on Pocketbook or wristlet
Tuesday 18th Make your own Backpack
Wednesday 19th Make your own Skirt

Sunday, January 26, 2014
Picking out a sewing machine by Consumer Reports
I found this little helpful hint to help you searching for a sewing machine hope it helps.
http://www.consumerreports.org/cro/video-hub/most-popular/most-popular/sewing-machine-buying-guide/17512520001/9138121001/
http://www.consumerreports.org/cro/video-hub/most-popular/most-popular/sewing-machine-buying-guide/17512520001/9138121001/
Tuesday, December 24, 2013
Rooster fabric

I'm so excited this is my first fabric design I just got in the mail and I want to share it and here it is.
Now you can buy the Galo de Barcelos fabric on Spoonflower here is the link http://www.spoonflower.com/profiles/mariasewsalot
Saturday, December 14, 2013
Soccer Mom

I've been wanting to make these beanies for really long time and I finally found an embroidery that I like and hats that I liked. They come in four different colors for now black, white, royal blue and red. I just love them they keep me nice and toasty on those cold soccer days and nights. I love watching soccer but hate being cold and I hate the rain so you'll find me there. Underneath my umbrella with my blankets and my soccer beanie. I am that soccer mom that screams for both teams if I know kids from both teams. I like to watch, I just like to make sure that nobody gets hurt and that they do play fair I hate watching dirty soccer. Here are my beanies hope you like them 
Subscribe to:
Posts (Atom)